
Some time ago I became fascinated by surface mount technology (SMT). Although it is a technology intended mainly for large-scale industrial production, to some extent it can be easily mastered even in amateur conditions. This technology offers many advantages.

In particular, the same electronic wiring made from surface mount components (SMD) takes up much less space than an identical circuit made of classic components. Their soldering is faster and only a fractional amount of tin is used for it, so after a few years of such tinkering, it is also cheaper for an amateur. You can also solder with an ordinary soldering iron. For me personally, it's also important that I don't have to drill any holes because it's holding me back (life is too short to QRP and drilling holes) and even my XYL does not like the noise of the drill and the laminate sawdust embedded in the carpet. With a very moderate amount of care (and as for me, I'm not overly careful), the printed circuit motif can be drawn with the thinnest alcohol-based marker with a tip thickness of 0.3 mm.
Some SMDs have one more interesting advantage, which is a lower price compared to the classic version of the same component. This results from the fact that their cases take up many times less volume compared to classic ones, and their outlets are only a fraction of the length and width of classic ones. Especially for integrated circuits, the ratio is in the order of 1:100. When you realize that the IO SMD manufacturer has a hundred times lower costs for potting compound and lead plates, you understand that this simply has to be reflected in the price, since the chip inside is exactly the same. However, this is not always the case.
Practical tips for working with SMD
-
Surface connection Get the so-called permanent loops for the transformer. The diameter of the active part of these loops is usually 0.3-0.8 mm. They heat up less, so they do not destroy the components and do not cause the copper to peel off the printed circuit board.
- Some adjustable soldering irons may seem more suitable for you, but only until you find that their tip is too thick for SMD soldering. If you don't have a special soldering iron with a thin tip, a transformer soldering iron with a thinner loop will do just fine.
- Buy tin with a small diameter. For SMD, "thick" tin with a diameter of 1.5 mm and more is not suitable, because you only need a small drop of tin to connect the SMD component. If possible, buy tin with an additive of silver, it has a lower melting point.
- It may surprise you, but replacing an SMD component is usually easier than using a conventional drilled circuit board. It is enough to heat all the leads and gently "pull" the part off the board. I was replacing a sixteen-pin circuit and eight resistors myself like this when I realized I had drawn a circuit board for a different connector. However, for large-scale experimentation, at least at KV frequencies, classical components and a universal or experimental board are often better.
- Don't be afraid to solder SMD ICs! If you don't overdo it with the tin, just run the soldering iron a few times over all the pins in a row and the tin will catch where you need it thanks to the surface tension.
- I draw the pattern of connections for integrated circuits by placing the circuit on the board and making a small dot at each leg. Then we fold the circuit, carefully draw the dots inward, then outward, and finally draw the other connections.
-
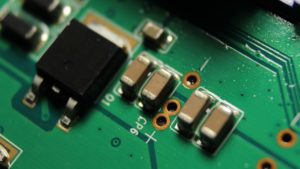
PCB with SMD components Using a photo path and a pattern printed on a laser printer on transparent film will make your work easier. However, with a simple connection, it is unnecessarily laborious compared to a few moves with a permanent marker.
- A magnifying glass is useful, but sometimes you can do without it.
- The biggest enemy of SMD is a small market. Because of this, you won't find SMD versions of some popular circuits, such as SA612, Atmel's AVR microcontrollers, etc. in regular stores. Expect that sometimes you have no choice but to use a classic IO in a DIL case.


A few tips for buying SMD
-

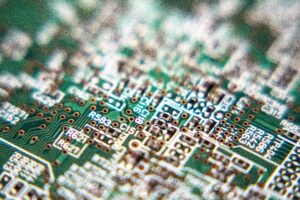
Surface connection VHF parts in TS-2000 When buying resistors, you only need to prepare according to the catalog. The resistors are marked, so you can easily recognize them after purchase, or measure them.
- Transistors and diodes have special markings, as the entire type designation usually does not fit into a 0.9 × 1.8 mm case. Find them out in advance, it is usually in the manufacturer's catalog sheets. Do not expect help from the seller.
- Capacitors, on the other hand, are not marked, so either ask the seller to mark each value, or measure them at home. If you have nothing to measure capacities and you cannot rely on the help of the seller, buy capacitors so that you have a different number from each value. Keep the ticket with the shopping list and after the purchase, mark each container with capacitors with a marker or a micropencil.
-
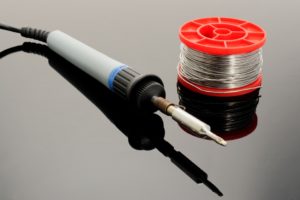
Soldering iron Better buy larger parts sizes so you don't have to use a microscope when fitting the board. For resistors and capacitors, I recommend size 1206 (3.2 × 1.6 mm), for integrated circuits the SO case (TSSOP cases have lead pitches of 0.635 mm; hardly anyone can draw that with a marker).
- Leave the purchased parts in the bins, do not show them on the street and do not brag about them unnecessarily. It's not because someone envies you, rather you may lose them by accident. This is how I once showed my wife the BC848 transistor, which was hanging on tweezers by magnetic force. "And where do you have it?" asked the surprised woman. We never found him again. It's a shame for the crown, but it's quite a shame on a Sunday morning.


So don't hesitate and get down to it with enthusiasm. You will see that you will have a lot of fun.
Jindra, OK1FOU