
In hamshack, a PSV meter is often taken for granted. Connect it between the TCVR and the antenna, press PTT, check the PSV and that's it. But anyone who has ever compared a cheap diode wattmeter with a quality directional coupler knows that the reality is more complicated. The nonlinearity of the detection diodes, different behavior at low powers, noise on the ADC input and limited accuracy of analog bridges can turn a simple measurement into a decent compromise.
Project Arduino PSV metro by DG7EAO is interesting precisely because it solves some of these problems in software. It is not just an "Arduino with LCD“, ale praktický prístup, kde mikrokontrolér kompenzuje fyzikálne nedokonalosti analógovej časti. V kombinácii s vhodným PSV snímačom ide o použiteľný nástroj pre QRP aj bežný hamshack.
In the article you will read
Why a calibration table makes more sense than a simple formula
The biggest practical benefit of this concept is the use of a calibration table instead of a naive linear ADC → power conversion.
The classic problem of a diode detector is well known: the rectifier diode does not have a linear transfer characteristic. At low signal levels, the error is significant because the threshold voltage of the diode causes small voltage differences to not lead to a proportional change in the output. If we were to use a simple linear conversion of the type:
W = k × ADC
the result would be practically unusable at low power levels.
The DG7EAO program instead uses a segmented calibration table with linear interpolation between points. Typical principle:
- ADC value 57 ≈ 1 W
- ADC value 87 ≈ 2 W
- ADC value 111 ≈ 3 W
If we measure a value between these points, the firmware calculates the power by interpolation. This creates a piecewise linear approximation of the real nonlinear characteristic.

The result?
- significantly better accuracy at QRP performances,
- more sensible behavior with low reflected energy,
- calibration option for a specific directional coupler.
This is exactly the difference between an "Arduino gadget" and a measuring instrument.
Hardware used for PSV meter
The project is intentionally simple in terms of hardware, which is its advantage. The core is a classic Arduino with an AVR ADC, while the firmware uses an internal analog reference instead of the supply voltage. This is a sensible decision, as USB or unstable power supply would otherwise introduce additional errors.
Hardware blocks
| Block | Function |
|---|---|
| Arduino (ATmega328P class) | ADC processing, calculations, display logic |
| 16×2 LCD | Local display of PSV, power and bargraph |
| A0 | Forward power |
| A1 | Reflected power |
| Digital input (mode switch) | Switching screens |
| PSV sensor | Directional coupler / tandem bridge |
The LCD is connected in parallel via the LiquidCrystal library. From today's perspective, an I2C LCD would be more elegant, but for a simple build this is a robust solution.
What the program does
The firmware is not just a simple display of ADC values. The measurement process takes place in several steps:
1. Reading forward and reflected power
Arduino reads A0 and A1 as forward and reflected channels. The values are not used immediately - the firmware keeps the maximum of multiple readings.
This is especially important with SSB, where the signal envelope is not constant like with FM.
2. Software noise filtering
The code implements a simple protection against random noise. If several consecutive samples fall below a defined threshold, the maximum is reset. This prevents the old peak value from "freezing".
It's more primitive than a moving average or a DSP filter, but it's perfectly adequate for an AVR.
3. ADC to Watt Conversion
Next comes the lookup table with interpolation. This is where the main added value of the project arises.
4. Calculation of PSV
After obtaining the forward and reflected power, the firmware calculates the classic relationship:
PSV = ( 1 + √(Pr/Pf)) / ( 1 - √(Pr/Pf))
which is a physically correct calculation derived from the reflection coefficient.
Software protection against noise and false PSV
An interesting detail is the suppression of meaningless values of reflected power.
If the reflected power is less than approximately 1% of the forward power, the firmware does not consider it relevant and replaces it with the minimum value.
Why is this important?
Without this protection, ADC noise or diode detector offset would generate unnecessarily high PSV with a well-matched antenna.
Typical example:
- Forward: 50 W
- Reflected from noise: 0.15 W
Formally, it looks like a real reflection, but in reality it is a measurement artifact.
This software fuse makes the measurement more stable.
Display modes
The firmware supports two modes.
Classic meter mode
Displays:
- PSV numerically,
- PSV bar graph,
- forward power (Wf),
- reflected power (Wr).
This is handy when tuning an antenna, LPF or tuner.
Bargraph mode
The second mode works as a simple dual wattmeter:
- top row = forward power,
- bottom line = reflected power.
For quick checks during operation, this is clearer than a numerical readout.
Which PSV sensor to use?
The Arduino itself is just a digital backend. The accuracy is determined by the directional coupler.
Tandem bridge

Tandem match is an excellent choice for KV. It has good directional directivity and consistent behavior over a wide power range. It is precisely with simple wattmeters that the diode nonlinearity error is manifested at low powers, which a better directional concept helps to limit. The material OK1AYY will also help you choose the appropriate connection for the PSV meter. Amateur designs of frequency-independent SWR/PWR meters for KV or Tandem Match bridge SWR 1.8 – 50 MHz 1KW
Advantages:
- good linearity,
- decent accuracy,
- vhodné pre KV contest also common DX traffic.


LA8AK directional coupler
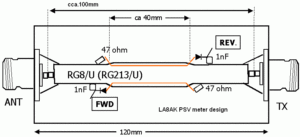
LA8AK The solution is popular among radio amateurs, especially for its simplicity of construction and reproducibility. In combination with this digital calibration, it can be very useful.
It is important that the sensor is mechanically stable.


Possible improvements
PC connectivity
The most logical extension is USB serial output.
Arduino could stream:
- forward performance,
- reflected power,
- PSV,
- timestamps.
This will allow logging or long-term monitoring of antenna behavior.
GUI application
A simple desktop GUI could display:
- real-time performance graph,
- PSV trend,
- alarm when limit is exceeded,
- export CSV or ADIF-like log meraní.
EEPROM calibration
Instead of a hard-coded table, it would be elegant to store the calibration points in EEPROM. This would allow fine-tuning the meter for a specific coupler without recompiling the firmware.
More modern display
An OLED or graphic LCD would allow needle emulation, histogram or peak hold.
Conclusion
The Arduino PSV meter by DG7EAO is a good example of how sensible firmware improves a classic amateur radio analog design.
It's not a laboratory Bird wattmeter, but it's not a toy either. If you use a quality directional sensor, adapt the calibration table to your own hardware, and fine-tune the ADC reference, you'll end up with a surprisingly usable tool for both QRP and regular HF operation.
For a radio amateur who likes to combine RF technology with microcontrollers, this is a very natural project: a little analog, a little DSP thinking, and a result that will actually serve in a hamshack.

I designed it years ago. The HF sensor comes from a different design. It was damaged by excessive power input. I made several adjustments to the program, for example, I have two calibration tables (for HF and 144 MHz) and a slightly modified method of displaying and averaging values. The main advantage is the possibility of applying the calibration table, which makes the measurement more precise.