")
FC-10 automaticky ladí frekvence KV transceiveru a antén použitím mikropočítačového řízení. Tato funkce je speciálně použitelná, když SWR antény není dostatečně nízké pro frekvence, které jsou daleko od kmitočtu rezonanční frekvence antény.
V článku sa dočítate
SPECIFIKACE
| Frekvenční rozsah | 160 – 10 M |
| Vstupní impedance | 50 Ohm |
| Maximální vstupní výkon | 100 W PEP |
| Přizpůsobení SWR | 1:1,5 nebo lepší |
| Výkon pro naladění | 8 W nebo více |
| Čas pro vyladění | 0,5 sekundy pro paměť |
| Rozsah vstupní impedance | 16.5 – 150 0hm (pro SWR lepší jak 3) |
| Paměť | 31 (viz tabulka) |
| Napájení | DC 13,5 V (z FT-840) |
| Odběr | 700 mA maximálně |
| Pracovní teplota | 0 – 50 stupňů C |
| Rozměry | 117mm (V) x 93mm (Š) x 243mm (H) |
| Váha | 2kg |
- FC – 10 má 31 frekvenčních pamětí. Každé z 9-ti pásem (včetně WARC) v rozsahu 1,8 -30 Mhz amatérského pásma bylo uloženo v jedné paměti (dvě pro pásmo 28 Mhz), jak je ukázáno v tabulce 1. Mimo to dalších 21 pamětí není obsazeno žádným odpovídajícím pásmem.
- Můžete použít tlačítko TUNER na rádiu pro jednodotykové vyvolání frekvence z paměti frekvencí, která byla již uložena.
Tabulka č. 1:
| 1.9 MHz | 1.8 až 2.0 MHz |
| 3.5 MHz | 3.5 až 4.0 MHz |
| 7 MHz | 7.0 až 7.5 MHz |
| 10 MHz | 10.1 až 10.15 MHz |
| 14 MHz | 14.0 až 14.5 MHz |
| 18 MHz | 18.068 až 18.168 MHz |
| 21 MHz | 21.0 až 21.5 MHz |
| 24 MHz | 24.89 až 24.99 MHz |
| 28 MHZ | 28.0 až 29.0 MHz |
| 29.0 až 29.7 MHz |
Je zde 31 paměťových frekvencí je použitelných: a z toho 21 pro použití v jakémkoliv jiném pásmu.
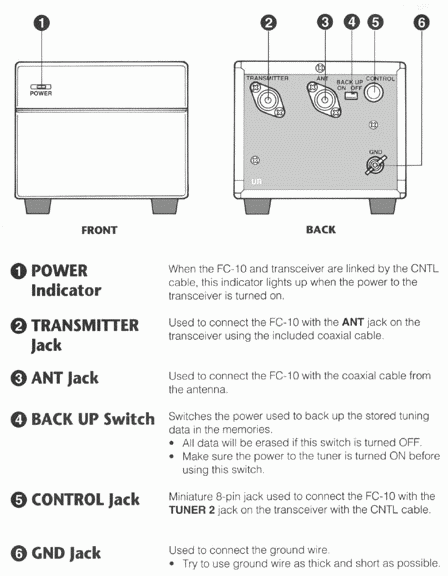
OVLÁDÁNÍ A KONEKTORY
1. POWER indicator – když FC-10 a FT-840 jsou propojené kabelem CTNL, dioda led se rozsvítí, pokud je zapnuta FT-840.
2, TRANSMITTER jack – konektor používaný pro spojení FC-10 s ANT konektorem na FT-840 použitím přiloženého koaxiálního kabelu.
3, ANT jack – používaný ke spojení FC-10 s koaxiálním kabelem antény. 4, BACK UP přepínač – spíná napájení použité k návratu ladicích dat uložených v pamětích.
* Všechny data budou vymazána pokud přepínač bude v poloze OFF (vypnuto).
* Ujistěte se, že napájení tuneru je zapnuto před použitím tohoto přepínače.
5, CONTROL konektor – miniaturní osmikolíkový konektor používaný pro spojení FC-10 s konektorem TUNER 2 FT-840 pomocí CNTL kabelu.
6, GND konektor – používá se pro připojení uzemňovacího vodiče.
* K uzemnění zkuste použit co nejsilnější a co nejkratší vodič jak jen to je možné.

KABELOVÉ ZAPOJENÍ
1, Konektor „TRANSMITTER“ – (na FC-10) propojíte s konektorem anténního výstupu transceiveru FT-840.
2, Konektor „CONTROL“ – (na FC-10) propojíme kabelem CTNL na zdířku TUNER 2 na FT-840.
3, Konektor „ANT“ – (na FC-10) zde připojíme anténu.
UPOZORNĚNÍ:
* Ujistěte se o tom, že nemáte opačně zapojené (prohozené konektory) FT-840 a anténního konektoru na FC-10.
* Když používáte FT-840, vyvarujte se toho, aby konektory TUNER 2 a BAND DATA byly stejného typu. Tuner nebude pracovat pokud budou tyto konektory zapojeny nesprávně.
OVLÁDÁNÍ FC-10
Při připojení k FT-840
* Zapnutím FT-840 zapnete FC-10.
* Stlačením tlačítka TUNER na FT-840 vyvoláte (aktivujete) paměť FC-10.
* Stlačením tlačítka START na FT-840 začnete operaci ladění na FC-10.
* „TUNER“ – kontrolka se rozsvítí na displeji FT-840, když je ladění „OK“ (ukončeno), nebo byla použita paměť.
* „WAIT“ – (čekej) se objeví na displeji FT-840, když probíhá ladění.
*“HI SWR“ – (vysoké SWR)se objeví na displeji FT-840, když SWR bude mít vyšší poměr než 3:1.
Tuner nepracuje v určitých případech, dokonce i když tlačítko START je stlačeno
* Když používáte jiná pásma než amatérská (např. se split, FM, RPT).
* Když knoflík RF PWR je otáčen proti směru otáčení hodinových ručiček (v tomhle případě točte knoflíkem RF PWR ve směru hodinových ručiček – doprava – kvůli ovládání tuneru – zvýšením výkonu).
* Když je odpojená anténa.
Ladění může začít v jakémkoliv módu radiostanice
Stlačením tlačítka START na FT-840, se automaticky zredukuje ladící výkon na 50W.
FC-10 – funkce – automatický start
* FC-10 provede automatický start, když během přenosu je SWR 3:1 nebo větší, ladění zapracuje automaticky (doladí a to i když data nejsou uloženy).
POUŽITÍ FC-10
Normální činnost
1, Zapněte rádio.
2, Nastavte výkon vysílače na maximální úroveň (otáčejte knoflíkem RF PWR doprava).
3, Stlačte tlačítko START na radiostanici.
* „WAIT“ se objeví na displeji a FC-10 začne ladit, aby dosáhlo co nejnižšího SWR.
4, Když je ladění ukončeno indikace „TUNER“ se rozsvítí.
* Vysílání může začít.
Ladění
* Když je SWR menší jak 1.5:1 data tuneru jsou uložena do paměti. Stlačte tlačítko TUNER – potom se tato frekvence automaticky přenáší k uloženým datům a vytáhne je z paměti.
Ladění trvá přibližně 1 až 10 vteřin
* Když SWR je 1.5:1 nebo větší, data tuneru se neuloží. To znamená že musíte stlačit tlačítko START pokaždé, když pracujete blízko téhle frekvence pro znovuzahájení nového ladění.
Ladění trvá přibližně 10 až 30 vteřin
* Když SWR překročí 3:1, a nebo, když ladění trvá déle než 30 vteřin, objeví se na displeji FT-840 „HI SWR“.
Pokud se rozhodnete vysílat s takhle vysokým SWR, nejdříve vypněte tuner stlačením tlačítka TUNER a snižte vysílaný výkon otáčením knoflíku PWR do leva (proti směru otáčení hodinových ručiček).
Tyhle kroky sníží odpor ke koncovému výstupu tranzistoru tak nízko jak je to možné, upravujíc optimální podmínky pro vysílání.
POZNÁMKA: (vysílání s SWR 3:1 a vyšším může způsobit poškození tuneru).
*I když FC-10 může snížit SWR v časových intervalech jeho sladění (sesouhlasení) s koncovým stupněm radiostanice, aktuální rezonanční frekvence anténního členu nebude přizpůsobena (tj. anténa se nenaladí). Doporučujeme přizpůsobení antény na přijatelnou úroveň a snížení SWR na minimální možnou úroveň před použitím anténního tuneru.
Ladění FC-10
Po stlačení tlačítka TUNER na panelu FT-840 (Na displeji FT-840 se rozsvítí „TUNER“) anténní tuner FC-10 pracuje dle popsaného textu:
1, Data pro operační (pracovní) frekvenci jsou poslána z vysílače do anténního tuneru. FC-10 potom vybere z jeho paměti z předešlých ladění ladící data pro frekvenci nejbližší k operační (pracovní) frekvenci a přetvoří podmínky ladění (viz.poznámka dole) pro tuhle frekvenci tak jak byly uloženy. Data pro pracovní frekvenci jsou dolaďována zhruba každých 10 Mhz. (Když měníte frekvence otáčením ladicího knoflíku na radiostanici, hlášení „WAIT“ se ihned objeví na displeji jak začne ladění).
Pokud zvolená frekvence nebyla předtím nikdy použita, žádné ladicí data nebyly pro ni uloženy do paměti FC-10. Tady anténní tuner vytáhne z paměti továrně nastavená data pro pásmo, které právě používáte.
2, SWR je měřeno v době vysílání. Když SWR překročí poměr 3:1, automaticky se iniciuje ladění s objevením zprávy „WAIT“ na displeji FT-840. Ladění může trvat nějaký čas než se ukončí, zatímco vysílač je zaklíčován (např. během SSB, ladění potřebuje čas pouze při modulaci).
Data nejsou uloženy pro stavy, kdy SWR je 1.5 nebo větší, potom zjistíte, že ladění proběhne rychleji stlačením tlačítka START.
Po stlačení tlačítka TUNER na panelu FT-840 (se rozsvítí „TUNER“ na displeji FT-840), FC-10 pracuje následovně:
1, Data pro pracovní frekvenci jsou poslána z jednotky frekvenčního řízení CPU ve vysílači do anténního tuneru. FC-10 potom vybere z jeho paměti z předešlých ladění ladicí data pro frekvenci nejbližší k pracovní frekvenci a vytvoří podmínky ladění (viz pozn. dole) pro tuhle frekvenci tak jak jsou uložena. Data pro pracovní frekvenci jsou dolaďována, když měníte pásma (rozsah), nebo ladíte dál od paměti frekvenčního tuneru.
Když změníte frekvenci otáčením ladícího knoflíku na transceiveru, „WAIT“ se objeví na displeji jak začne ladění.
Když frekvence, kterou jste si vybral nebyla předtím použita, a nebyly ani žádné ladicí data pro ni uloženy v paměti FC-10. Potom anténní tuner vytáhne tovární data pro pásmo, které právě používáte.
2, SWR je měřeno v době vysílání . Když překročí 3:1 ladění se automaticky iniciuje se současným rozsvícením „WAIT“ na displeji FT-840. Protože data nejsou ukládány při SWR 1,5 a víc, stlačte tlačítko START znovu k uložení aktuálních dat do paměti ladění FC-10.
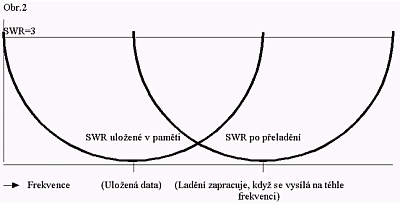
3, Ladění je úspěšně ukončeno, paměťová anténní nastavení se mění jak je popsáno na obr.2 . Když měníte frekvence otáčením ladicího knoflíku a vysíláte při SWR větším než 3:1 (situace popsána v kroku 2 nad) ladění automaticky zapracuje. (To je ono, proč „WAIT“ se rozsvítí momentálně následkem vysílání na takových frekvencích). Data nejsou uložené pro takové frekvence a vy musíte stlačit znovu tlačítko START.
POZNÁMKA : data uložené v pamětích FC-10 určují hlavní nastavení, když anténní tuner je v činnosti.
UPOZORNĚNÍ :
* Když vypnete obvod pro paměť, všechny ladicí data v pamětích anténního tuneru budou vymazána (mimo továrních dat).
* Když čistíte a iniciujete všechny paměti FT-840, paměti anténního tuneru budou čisté a jako takové aktivovány (dokonce i když tuner je vypnut).
31 pamětí anténního tuneru FC-10, jedna výhradně pro každé z 9 HAM pásmem (dvě pro 28 Mhz), a 21 dalších pamětí pro použití v kterémkoliv pásmu. Paměti drží informace z posledních ladění, umožňujíc rychlejší ladění pro ta pásma, které jsou nejčastěji používána.
UPOZORNĚNÍ TÝKAJÍCÍ SE POUŽITÍ FC – 10
* připojujte anténu k FC-10 s impedančním přizpůsobením 50 ohm nebo podobné. Když chcete použít uzemněnou anténu typu „dlouhý drát“ nebo „whip“ anténu s uzavřeným koncem (dipól s venkovním napájením), odpojte FC-800. Obě, FC-10 i FC-800 nemohou být zapojené současně (paralelně) k FT-840 (když je zapojíte oba ATU – nebudou pracovat).
* Když je úroveň vysílaného výkonu nepřijatelná, ladění nezapracuje. Nastavte knoflík RF PWR na maximum a zkuste ladit znovu.
* Když chcete použít přepínač BACK UP, vždy se nejdřív ujistěte že FC-10 je vypnuto.
* Neumísťujte žádné objekty před mřížky ventilátoru FC-10, zvlášť ve přední části přístroje.
* Když zapojujete CNTL kabel, vždy nejdřív vypněte FC-10. Pokud je CNTL kabel přepojován při zapnutém přístroji, (na displeji FT-840 svítí „TUNER“) ozve se varovný signál a zhasne „TUNER“. Když přepojujete kabel v takové situaci, vždy vypněte nejdřív napájení FT-840.
* Zpráva „HI SWR“ se ukazuje jenom na displeji FT-840, když je zapojena FC-10, a neukazuje se při zapojení FC-800.
* Ujistěte se že nedošlo k záměně konektorů TUNER 2 a BAND DATA (později použité pro FL-7000 ) na FT-840. Oba konektory jsou stejné 8-kolíkové ( kdyby jste je zaměnili, „POWER LED“ se rozsvítí a tuner přestane pracovat, předcházejíc nějaké možné škodě).
PORUCHY
* Tlačítka TUNER a START nekorespondují ! Vypněte napájení, zkontrolujte kabely a znovu zapněte napájení
* Ladění se zastaví brzo po zapnutí tlačítka START ! Když tlačítko START je stlačeno, ladění začne ve frekvenčním pásmu v paměti FC-10. Když SWR antény je 1,5 nebo nižší, objeví se „TUNER“ na displeji FT-840 a ladění bude brzo ukončeno
* Ladění nepracuje úplně !
* Zkontrolujte připojení koaxiálního kabelu k anténě
* Točte knoflíkem RF PWR na FT-840 doprava
* Zkuste upravit úhel a délku antény
* Uložené nastavení se ztratilo ! Vyměňte lithiové baterie použité pro paměť.
Výměna zálohovací lithiové baterie
1, Přesuň BACK UP přepínač do polohy vypnuto.
2, Odstranit pět šroubů na vrchním krytu skříně a odklop ji.
3, Vyjmi starou lithium baterii z objímky v desce na vrchu šasi a nahradit ji novou stejného typu.
4, Dej na dřívější místo vrchní kryt skříně a šrouby.
5, Opětovně připoj kabel, zapni transceiver, a přesuň BACK UP přepínač do polohy zapnuto.
Drobné zkušenosti s FC-10
Skutečně mohu říct , že vzpomínaný FC-10 pracuje tak jak je popsáno v manuále. Přesto mám několik zkušeností:
1, Pokud používáte ATU v úseku pásma , kde máte vyladěnou anténu na SWR pod 1,5 a méně, ATU vám už SWR nesníží. Spíše naopak zvýší. Takže je potřeba tuner tlačítkem TUNER na FT-840 vypnout. A jakmile se dostanete na stranu pásma, kde už SWR bude vyšší než 1,5 bez problému jej můžete zapnout a bude fungovat.
2, Stalo se mi po několika letech používání, že jsem potřeboval doladit anténu a po zmačknutí tlačítka START tuner začal ladit, ale nechtěl přestat. A to i přesto, že anténa měla SWR 1,7. Může se stát, že dojde k slepení kontaktů relátek. Problém se náhodně před odesláním na opravu vyřešil tak, že po převozu autem a po přestěhování na jiné místo opět tuner začal fungovat a funguje dodnes. Že by kalibrovaný úder?
3, Pokud se vám stane, že omylem zapojíte koaxiální kabely na tuneru opačně a zaklíčujete rozsvítí se vám HI SWR , tak přestaňte vysílat a radši rychle zkontrolujte kabely a modlete se, aby to po přehození fungovalo tak jak má. Stát se to může, ale ne vždy to zařízení může přežít ve zdravý.
4, Výměna zálohovací baterie by neměla být žádný problém. Za pět minut není co dělat
73! Vlado
Ja už len dodám, že Vladovi za tento článok ako aj niekoľko skúseností ďakujeme a s prianím: „nech to vždy dobre ladí!“ sa tešíme na ďalšie články…