

You will read in the article
Introduction
Currently, the AMSAT Oscar 40 satellite (pre-launch designation Phase 3D), which was the largest satellite project in the history of radio amateur satellites, is already in operation. Oscar 40 has the so-called matrix transponder, that is, different combinations of uplink (input) and downlink (output) can be selected. After several months of operation, it appears that the main satellite mode will be US - uplink on the U band (435 MHz) and downlink on the S band (2.4 GHz). Most active stations also use this combination. In addition to the uplink on 435 MHz, there is also an option in band L (1296 MHz) and band V (145 MHz) and downlink in band K (24 GHz), but currently the US mode is most active. That's why I decided to build a station for this mod. The parameters of the satellite transmitter of the AO-40 satellite allow ground stations to use antennas with relatively small dimensions.
V mojom článku popíšem jednoduché antény pre pásma 435 MHz vysielaciu anténu 9 prvkovú yagi and for the 2.4 GHz receiving antenna, a dish with a helical radiator. This set-up has also proven itself in practice. Similar antennas are also used by a number of active stations around the world. In this article, I did not want to describe in detail the complete antenna system from A to Z, but I wanted to give ideas and inspiration for experimentation through the Oscar 40.

Broadcast antenna on 435 MHz
Making an average good antenna for 435 MHz should not be a problem even for a radio amateur - a beginner. For this we will need aluminum or duralumin material and also some basic tools (meter, saw, files, drill, drills, vise...). For this band we will use a 9-element Yagi antenna of linear polarization, according to Karl Rothammel's antenna book. [ 1.] Of course, this is the minimum, more demanding people can make and use longer antennas. The best solution is the use of cross Yagi antennas - however, the production and use (attachment, rotation...) of such antennas is much more demanding, so for the first attempts a smaller antenna will suffice - in our case, 9 elements. You can see the antenna in Fig.1. – its total length is a little over 1m, so there will be no problem attaching the antenna behind the reflector. We use square duralumin material 20×20 mm or a pipe with a diameter of 20 mm as a strut. We cut the boom so that there is enough reserve behind the reflector to attach the antenna. All elements are made of 4-6 mm material and are mounted on the boom without insulation. The antenna according to the original source has a gain of 11.5 dB, a front-to-back ratio of 19 dB, a horizontal radiation angle of 44 degrees and a vertical radiation angle of 48 degrees. The impedance of the antenna is 240 Ohm, therefore, for feeding with a coaxial cable, it is necessary to use a balun transformer. The calculation, procedure and method of execution was described in RŽ 6/98 [2.] and also in other literature. We close the power point watertight in a plastic box. We will test the finished antenna (at least SWR and others if possible...).

Receiving antenna for 2.4 GHz
Making an antenna for the 2.4 GHz band will no longer be as simple as for 70 cm. The first step is to choose a suitable antenna for reception in this band. When we look at what is used in the world, the conclusion is clear: most stations use a satellite dish. In addition to parabolic antennas, helix, loop, Yagi and their modifications are also used. However, at 2.4 GHz, the dimensions of classic Yagi and loop antennas are already so small that their construction is difficult. A helix is also a possibility. However, we want an antenna that will have sufficient gain and a relatively simple mechanical construction. Such an antenna will clearly be a dish. We don't have to laboriously make a parabolic mirror at home - different parabolas with a diameter of 60 cm to 1 m can be used for satellite and MMDS television. For the sake of simplicity, we will work with a central dish - the use of an offset dish is also possible, many stations use them. An older central dish with a diameter of 90 cm and 1 m can be bought for a few hundred crowns, if we are lucky, even for less (hi...). I use a dish with a diameter of 1 m.
Druhá otázka, ktorú musíme skúmať je ožarovač. V literatúre nájdeme pre toto pásmo popisy rôznych ožarovačov. Ja osobne som vyrobil a vyskúšal niekoľko druhov a riešení (podľa DB6NT, DK1VC, OE9PMJ, atď.). Tie však majú lineárnu polarizáciu a sú vhodnejšie na bežnú prevádzku. Pre satelitnú prevádzku by bol lepší feed s cirkulárnou polarizáciou: u EME stations is a very widespread and popular irradiator according to VE4MA and for Czech EME stations (OK1DFC, OK1CA, OK1UWA) also a feed with a septum-polarization switch. Many amateurs use a helix emitter for satellite systems. There are several design solutions, such as according to G3RUH, G6LVB...etc. [ 3.] etc. The Helix irradiator has several advantages, such as: the aforementioned circular polarization, simple construction and assembly. For simplicity and mechanical simplicity, I chose a helix radiator - so we are decided: we will use a central parabola (with a diameter of around 90 cm if possible - more profit...) and a helix radiator and a converter directly connected to it as one structural unit.
After obtaining the parabola, we dismantle all structural elements that we will not use - so we only have a bare parabolic mirror. We will make a suitable fit - everyone has to deal with it individually as possible. You can see one of the possible solutions in fig. 2.:
1. long screw at least M8
2. screws M4 – M5
3. ring made of 3 mm Al
4. holes for screws pos. 2.
5. flat and flexible pads
6. M8 nut for screw pos. 1.
7. washers and nuts for screws pos. 2.
8. hole for screw pos. 1. on the parabola
9. holes for screws pos. 2. on the parabola
10. counterweight
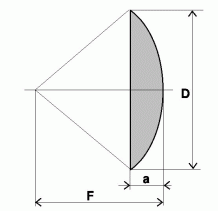
We measure the exact diameter and depth, according to which we calculate the focal point. – fig.3.
Formula used: F = D2/16a
where D – is the diameter of the parabola
a – is the depth of the parabolic mirror in the axis
When calculating, we can use various articles and publications, such as in RŽ 4/99 by Zdenek OK1DFC, [ 4.] etc. After calculating the focal length, we start making the illuminator: first we calculate the diameter of the reflector, the illuminator and the distance between the threads. We use formulas:
Reflector diameter R = 0.62 lambda
The distance of the emitter from the reflector A = 3900/f [cm, MHz] or A = 0.13 lambda
Distance between turns S = 7200/f [cm, MHz] or S = 0.24 lambda
Emitter diameter D = 9300/f [cm, MHz ] or D = 0.31 lambda
You can see the basic dimensions of the helix antenna in Fig. 4 (above).
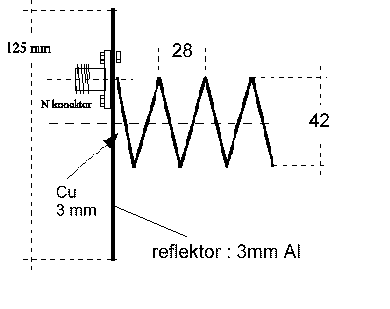

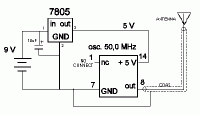
But when we don't want to do the math, we can find a calculated and described helix irradiator in the literature (e.g. according to OK2AQK, [ 5.] or G3RUH) or on the Internet [ 6.]. You can see such an irradiator in fig. 5. In fig. 6. you see the finished emitter of the helix irradiator: the material is Cu wire with a diameter of 3 mm - I used additional material for welding (diameter 3.15 mm) by winding the entire length (1 m) on a mandrel of a suitable diameter. The number of turns will be a maximum of 4 to 5. When spinning, pay attention to the sense of rotation: the signal from the satellite has clockwise polarization, - e.g. we would wind the helix antenna in a right-hand direction, but in the case of the irradiator it must be the opposite, then left-hand. We will make the reflector from 2 mm thick aluminum sheet. We will drill three holes on the reflector, shifted 120 degrees from each other - for three brackets that will hold the radiator above the parabolic mirror - we will also drill the holes for the holding brackets on the parabolic mirror. We will make the brackets from aluminum logs with a diameter of 8 mm - cut them to the required length (leave a 50-100 mm margin), cut M8 threads and bend them as needed. We will make and install the clips for the converter and irradiator covers. We drill a hole for the connector on the reflector - individually according to the mechanical dimensions of the converter - probably the hole will not be in the geometric center of the reflector. We choose the type of connector on the irradiator according to what kind of connector we have on the converter: I have an N socket (female) on the converter, so I mounted an N plug (male) on the irradiator. After fixing the connector on the reflector to the middle (live) contact, tin the emitter (Cu wire). Of course, we will make sure that it does not accidentally touch the reflector (or inanimate part) - the best way is to turn a suitable Teflon insert, but if we don't have the option, it is enough to thread a PVC tube on a Cu wire. Then we set the helical radiator so that the center is in line with the center of the reflector. We fix the radiator in the connector with a suitable glue. We fix the finished irradiator on the parabola (in the focal point according to our calculation) and try it. This can be individual depending on the converter used, but in my case it looked like this: as an MF receiver I use a Yaesu FT 290R transceiver with a range of 144.0 to 148.0 MHz. After connecting the converter data to TCVR 144,0 MHz sa zhoduje so skutočným prijímaným kmitočtom 2400,0 MHz. Z kryštálového oscilátora 50,0 MHz (ktorý kúpite za pár korún, alebo získate zo starej počítačovej základnej dosky) som vyhotovil malý „beacon“ podľa Obr. 7. 48. harmonická kryštálového oscilátora padne na kmitočet 2400,0 MHz, čo už viem prijímať. Keď anténku malého majáku priblížime k ožarovači na cca. 1 cm, tak na 2400,0 MHz (vtedy na tcvr 144,0 MHz), by sme mali počuť pískanie. [ 7.] Potom sa pokúsime o zachytenie signálu z družice. Po odskúšaní, keď je všetko v poriadku, tak môžeme pokračovať s povrchovou úpravou a s prichytením krytov. Na povrchovú úpravu je vhodný akrylový spray a ako kryt na zakrytie konvertoru je vhodná nádobka z umelej hmoty, alebo plechu (ja som použil prázdny obal od karosárskeho tmelu). Na zakrytie žiariča – ožarovača musíme použiť nádobku z umelej hmoty (PVC).
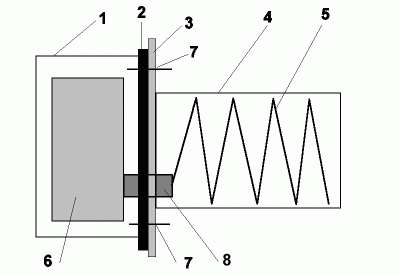
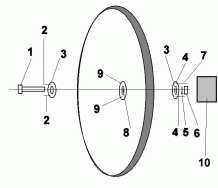
You can see the mechanical construction of the irradiator in Fig. 8. :
1. converter cover
2. rubber sealing ring
3. reflector
4. radiator cover (made of plastic)
5. emitter
6. converter
7. mounting holes
8. N connector (or plug)
After assembling the irradiator, we check everything again and have the dish ready for assembly.
Mounting of antennas - mechanical construction
We will mount the small system in such a way that we have the opportunity to experiment and that the power cables are as short as possible. We can solve the rotation simply - by hand. The apparent movement of the satellite is slow, so it is enough to point the antennas after 1-1 hour. A simple tripod or a holder by the window is also suitable for experiments. My solution is as follows: my satellite antenna system is on the roof with remote rotation AZ/EL, but for several reasons I did not want to mount the dish up (more than 30 m long downpipe, limited possibility of experimentation, etc.), so I mounted a small system on the window frame that I can rotate manually in both planes. The small system consists of a 4 el Yagi antenna for 2m, and the aforementioned 9 el Yagi antennas for 70 cm and a 1m parabola for 13 cm. This small system will find application when working through satellites FO-20 and FO-29, but also as a spare or second antenna system.
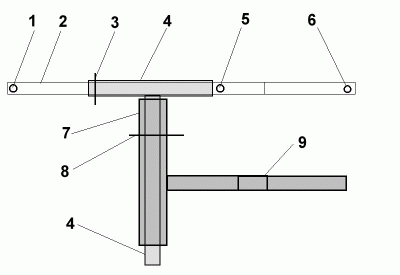
The arrangement and mechanical construction of the system is shown in Fig. 9:
1. antenna position on 145 MHz
2. horizontal boom for antennas (rotates vertically in pos. 4. )
3. mechanism for fixing the boom pos. 2.
4. T-shaped welded pipes (rotates horizontally in the pipe pos. 7)
5. position of the dish at 2.4 GHz
6. antenna position on 435 MHz
7. steel pipe
8. mechanism for fixing pipes item 4.
9. bracket(s) for mounting on the wall, or window frame
Although this solution is simple, it is not ideal: operation via satellites is limited only to the part of the orbit that the antennas "see".
Conclusion
Popísaný malý systém samozrejme nie je špičkou, ale na prvé kroky a dokonca aj na bežnú prevádzku postačí. Viem, že pre priemerného amatéra je ťažko dostupný aj SSB/CW vysielač s dostatočným výkonom na 70cm – o konvertore na 13 cm ani nehovorím, ale predsa sú možnosti na získanie jednoduchých, ale použiteľných zariadení – napr. jednoduchý transvertor 2m/70cm, converted MMDS converters, etc. It is easier to get to a local FM converter or a packet node than to a satellite transponder, but the effort will be compensated by nice connections, which are really an experience on the UHF/SHF bands even when we know that they are only connected via a converter at a distance of about 50,000 km from us. You can also find photos of the described antennas on my website: www.host.om7aq.sk or www.QSL.net/om7aq. I thank Zdenek OK1DFC for his cooperation and help.
Literature
[1] Karl Rothammel: Antennenbuch
[2] Antennas DL6WU for 435 MHz, Production of folded dipole (Radio Journal 6/98)
[3] http://www.ultimatecharger.com/dish.html
[4] Zdeněk Samek, OK1DFC: Calculation, design and construction of parabolic antennas (Radio Journal 4/99)
[5] Miroslav Kasal, OK2AQK: Receiver of satellite signals in the S band (Amatérske rádio 1995/1,2)
[6] http://www.g6lvb.com a http://www.moon-bounce.com/sband.html
[7] Amateur satellites (Radiojournal 4/02) and the VE2ZAZ website http://www3.sympatico.ca/b.zauhar/SigSourc/SigSourc.htm
Gyetvai Zoltán OM7AQ
gye@isternet.sk