Hádam v každej počítačovej predajni sa dajú zakúpiť slúchadlá s mikrofónom – náhlavná súprava. Asi pred piatimi rokmi som zhotovil zariadenie, ktoré obsahovalo NF kompresor, ekvalizér a roger beep. Vtedy som prepínanie vyriešil páčkovým prepínačom na prednej paneli. V I.subregionále som pri prvom spojení zistil, že zapisovať spojenia do počítača a v druhej držať ručný mikrofón je číra utópia.
Spomínaný „zádrheľ“ bolo možné vyriešiť stolovým mikrofónom alebo náhlavnou súpravou. Vzhľadom na to, že počúvam na slúchadlá, a nie reproduktor, zvolil som druhú možnosť. Chcelo to však lepšie prepínanie RX/TX. VOX sa mi nepozdával (obtiažne hľadanie vhodných časových konštánt, možnosť nechceného zopnutia). Ostávala teda už len jediná možnosť – nožný spínač, ľudovo povedané „šľapka“.
Jediný návod na konštrukciu som našiel v holickom zborníku 2000 pod názvom „Doplněk k závodnímu TRXu“ od Pepu OK2SFI&OK2KVM teamu. „Železňák“ sa mi nepozdával z estetického hľadiska a čiastočne aj z funkčného. Preto som sa rozhodol pre vlastnú konštrukciu.

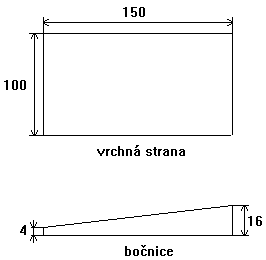 V rádiotechnike má kuprextit široké využitie. Okrem plošných spojov je možné z neho ľahko zletovať dutinu, alebo ohrádku pre VF obvody (ľahšie ako z plechu). Stačí nastrihať nožnicami na plech štyri kúsky kuprextitu a v rohoch zletovať 100W pájkou s minimom cínu. Nakoniec troška zabrúsiť ak niečo prečnieva a je to. Preto som na výrobu nožného spínača použil kuprextit.
Každý kus bude originál, preto si treba rozmery prispôsobiť svojim potrebám a použitému materiálu. Prv ako zarežete (alebo zastrihnete) do kuprextitu je vhodné mať všetky diely (pánty, pružinu a mikrospínače) prichystané a im prispôsobiť rozmery.
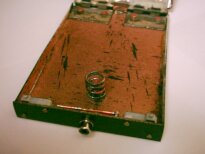
Začína sa presnou výrobou „u-čiek“ z hrubšieho kuprextitu. Na základný plát kuprextitu (150×100) sa naletujú bočnice (pozor na pravoúhlosť). Vrchné „u-čko“ je potrebné urobiť trošku širšie (cca.150×104), aby ľahko zapadlo do protikusu bez otierania bočníc.
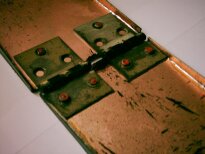
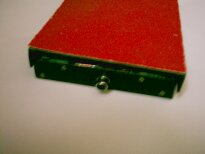
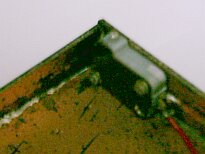
Teraz treba vyvŕtať diery na pánty a osadiť ich. „U-čka“ sa musia dať otvárať a zatvárať bez akéhokoľvek trenia. Na spodný diel sa prispájkuje zadná časť s konektorom cinch (uprostred) a dvoma mikrospínačmi (po krajoch). Tie je potrebné uchytiť tak, aby ich bolo možné stlačiť, čiže s miernym presahom nad okraj zadnej steny.
 |
 |
 |
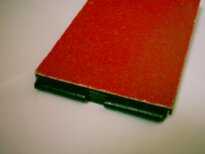 |
Doraz je vymedzený skrutkou (alebo lepšie dvoma skrutkami pri krajoch). Ich dĺžku je potrebné zistiť skusmo – aby po zatlačení vrchného dielu boli mikrospínače spoľahlivo zopnuté, no ešte ich nedrví. Zdvih je v mojom prípade asi 5 mm. Oceľovú pružinu je možné získať napríklad zo batériového priestoru nefunkčného elektrospotrebiča.
Už teraz je možné spínač vyskúšať, ba aj používať. No pôsobí ešte neohrabane. Preto odporúčam bočnice, zadný panel a pánty nastriekať autosprejom. Ja som použil zvyšok s odtieňom matná čierna (používam ho na prestriekanie plošného spoja zo strany súčiastok pred ich osadením – vyzerá to UFB).
 |
 |
Kuprextit sa na koberci šmýka a preto som zobral starú dušu pneumatiky z nákladného auta a vyrezal plát 100×150 mm, ktorý som Chemoprénom nalepil na spodnú časť. Gumu je potrebné poriadne prebrúsiť, potom drží výborne. Na vrchnú časť som nalepil brúsny papier (červený, hrubý). Takto sa noha šmýkať určite nebude, opotrebenie brúsneho papiera je minimálne.
Výsledok je estetický aj funkčný. Rozšliapnutia spínača som sa obával zbytočne. Kuprextit iba mierne pruží (pri nepresnom položení nohy zopne iba jeden mikrospínač). Preto odporúčam použiť dve mäkšie pružiny s dvoma dorazovými skrutkami, čím sa tento jav odstráni. Možno by pomohla aj výstuha z pásikov kuprextitu.
Náklady na stavbu sa v mojom prípade pohybovali okolo dvoch stoviek (pánty, mikrospínače, zvyšok čierneho spreja a duša z pneumatiky boli doma). Zakúpiť som musel len kuprextit, cinch, brúsny papier a lepidlo. Spínač bol hotový za tri poobedia.
Nožný spínač značne uľahčuje najmä contestovú prevádzku. Úsilie vynaložené na jeho konštrukciu sa Vám vráti už pri prvých spojeniach.